As you probably know, you have to block your knitted fabric before you can sew the seams or before you can wear a knitted piece, like a scarf.
Blocking is in fact stretching and shaping the knitted piece to achieve the desired form or to 'open up' lace.
Knitted lace must always be blocked.
Dupa cum probabil stiti, tricotajele trebuiesc blocate dupa ce le termini, ca sa puteti coase mai usor si mai frumos marginile. Sau inainte de a purta ceva tricotat dintr-o bucata, cum ar fi o esarfa.
Trebuie aici sa ii multumesc Dorinei din Timisoara, care m-a ajutat pe Lucru de mana sa aflu termenul folosit in romaneste pentru 'blocking', pe care nu-l stiam.
Blocarea inseamna ca se manipuleaza materialul tricotat umed, ca sa ia forma si dimensiunile dorite, dupa care se lasa sa se usuce, ca sa pastreze forma data.
Daca unele tricotaje nu au nevoie de blocare - desi e mai bine daca o faci, dantela trebuie intodeauna blocata.

By the way, if you are wondering what I was doing after my last posting, well ... I was knitting, of course. Meters of lace scarfs. I almost finished the blue scarf I wrote about (1m50, but it has to be 1m80). I shall post a picture when it is finished, with tassels. First I need to try it on my friend, to see how much more to knit.
Fiindca am ajuns aici. Daca v-ati intrebat cumva ce am facut de la ultima postare... pai, am tricotat. Metri de esarfa, fara exagerare! Am terminat aproape esarfa albastra, despre care am scris cand am aratat modelul. In model scria ca trebuie sa aibe 1m50, dar am vazut ca de fapt trebuie sa tricotez cel putin 1m80. Cand o voi termina, voi pune o poza.
Intai trebuie sa o probez, ca sa vad cat mai am de tricotat.
After some knitting I decided that I like very much the pattern of the blue scarf and I want four more scarves: for my daughter in law and her three girls. For them I bought a pale pink wool/acrylic blend Phildar Lambswool 51 (51 % lambswool and 49% acrylic; color eglantine). Needle 3 (European size).
Below is the real color, because I still do not know how to adjust the light on my camera.
Dupa ce am lucrat cam 0,75 m la esarfa albastra, am ajuns la concluzia ca imi place foarte mult modelul si ca voi mai tricota inca patru esarfe pentru nora mea si cele trei nepotele. Pentru ele am cumparat un fir din lana si acrilat, Phildar Lambswool 51 (51 % lana; culoarea Eglantine). Andrele nr. 3.
Culoarea adevarata o vedeti in poza de mai jos, fiindca nici pana acum nu am invatat sa reglez lumina si culorile la aparatul de fotografiat.
 I like very much this yarn and the colours they offer. It has both advantages of wool (warm, nice stitches) and acrylic (strong).
Imi place foarte mult acest fir de tricotat, pentru ca are ambele avantaje ale materialelor folosite: lana il face calduros si formeaza ochiurile foarte frumos, iar fibra acrilica il face rezistent.
For mom I already knitted 1m60. Yesterday I met her and I saw that the scarf has to be much longer, because she wants it to wrap around the neck. I can understand that, although it means much more work than the pattern promised! -:)!
Pentru mama copiilor am tricotat deja 1m60. Ieri am fost la fiul meu si am probat-o. Mai am destul de tricotat, pentru ca vrea esarfa in jurul gatului. Nu peste gat, cum era in model. O inteleg si cred ca are dreptate, cu toate ca asta inseamna destul multa munca in plus pentru mine.
Her scarf is the complete width of the original pattern. For the girls I used only one repeat (22 stitches the lace pattern) plus edges (60 stitches for the width). One scarf is finished (tassels not yet, because I intend to make them all at once). I read that a scarf for a 3-4 years old child has to be 1m long. As I saw yesterday, it is the correct size.
Pentru nora mea am folosit modelul asa cum vi l-am descris, cu trei benzi de dantela. Pentru fetite am folosit numai o banda (22 de ochiuri banda centrala de dantela) si marginile. 60 de ochiuri in total. O esarfa este deja terminata. Are 1m lungime, asa cum am citit undeva ca trebuie sa fie un fular pentru copii de 3-4 ani. Ieri am vazut ca este exact dimensiunea de care au nevoie, ca sa fie bine in jurul gatului si sa nu fie prea lunga.
The twins are thrilled to have scarves like mom's.
Gemenele sunt foarte incantate ca vor avea acelasi fular ca al mamei lor. De fapt pentru ele am tricotat, ca sa fiu sincera!

By the way, I block as I go, as explained below. This helps me to decide if I knitted enough, because I can see the real finished form. No guess work about how long or wide it will be.
That's why mother's scarf seams finished, but it is not. You can see the needles on the top.
Inca un lucru. Eu blochez direct ('as you go") dupa ce am terminat o buna portiune din esarfa si nu astept pana e gata toata esarfa. Acest lucru ma ajuta si la masurat / probat, fiindca stiu cum va arata si ce dimensiuni exacte va avea cand va fi gata. Veti citi mai jos cum se face.
Pentru ca blochez pe parcurs, vi se pare ca esarfa mamei e deja gata, dar nu este. Se vad andrelele in capatul de sus.
Now about blocking. First some general stuff / Acum despre blocare. Intai in general
You can do (a) wet blocking, (b) steam blocking and (c) spray blocking.
We are always wet blocking when we wash the knitted garment and let it dry in form on a towel (or a clean garbage bag if you want to speed up the drying process) to regain the original shape.
Puteti face blocare (a) umeda, (b) cu abur si (c) prin pulverizare.
De fapt facem mereu blocare umeda dupa ce spalam tricotajele si le lasam sa se usuce, asezate pe un prosop in forma pe care o vor avea cand vor fi uscate.
Stiati ca le puteti lasa la uscat pe un sac de plastic mare curat, ca sa se usuce mai repede? Inainte de asta trebuie insa sa scoateti cat mai multa apa din tricotajul spalat, prin rulare intr-un prosop uscat.
Wet blocking is the recommended method if you are dealing with synthetic (man-made) fibers or blends with such fibers. As you can read below, I steam blocked a yarn with 49% acrylic without problem.
To force the knitted piece to retain the dimensions you want, you have to use rust-proof pins or blocking wires.
Blocarea umeda este recomandata pentru tricotaje din fire sintetice sau amestecuri cu astfel de fire. Dar dupa cum veti putea citi mai jos, eu am blocat cu succes un fir cu 49% acrilat, asa ca...
Ca sa fortati tricotajul umed sa ramana in forma pe care i-o dati, veti folosi ace speciale de blocat in forma de T si fire de metal de blocat. Ambele nu trebuie sa rugineasca.
Steam blocking is the best method with fibers you do not want to get wet, like cottons. Cotton knits completely loose their shape if they get wet. Be careful with synthetic fibers which dislike hot temperature, because steam is hot.
You can first join and steam or first steam and then pin.
* You steam with a dampened press cloth and a hot iron. Place the dampened press cloth over the knitted piece and press very lightly. Please press, not iron! You need to get the knitted fabric slightly moist, but press until the press cloth is dry. It should not take very long, because the press cloth was not wet, only dampened.
* You can do steam blocking with a steam iron. Keep the iron just above the knitted fabric and give good shots of steam.
Blocarea cu abur este cea mai buna metoda pentru fire care nu trebuie sa fie udate, cum ar fi bumbacul. Tricotajele de bumbac se largesc mult, dupa ce sunt spalate. Atentie la blocarea cu abur a firelor care nu suporta temperaturi ridicate, pentru ca se lucreaza cu abur fierbinte.
Puteti sa umeziti intai tricotajul cu abur si apoi sa il prindeti in ace de gamalie, dandu-i forma pe care o doriti. Dar puteti tot atat de bine sa asezati intai tricotajul in forma finala, folosind ace de gamalie si apoi sa faceti blocarea cu abur. Cum va va fi mai usor si cum preferati.
* Blocati cu abur folosind o carpa curata pe care o umeziti usor. Nu trebuie sa fie uda. Puneti carpa peste tricotaj si dati usor cu fierul de calcat. De fapt nu trebuie sa calcati (miscarea laterala a fierului de calcat, la stanga si la dreapta sau in sus si in jos), ci trebuie sa presati: fierul se lasa peste material si apoi se ridica pentru a fi pus pe un alt loc. Diferenta dintre calcat si presat este foarte importanta in quiltuit si in croitorie, deci cred ca stiati despre asta.
Tineti fierul practic desupra carpei, nu apasati tare si asteptati sa se usuce carpa. Nu va dura mult, fiindca carpa este foarte usor umezita, nu uda.
* Puteti sa blocati cu abur folosind un fier de calcat cu abur, fara sa folositi o carpa. Aici trebuie sa aveti grija sa apasati si mai putin cu fierul de calcat.
Spray blocking is used for very delicate yarns, like silk or special (I mean very expensive) wool sorts.
You have to pin the knitted fabric in shape and spritz a bit of water over it. The fabric should be just dampened, not wet.
Blocarea prin pulverizare se foloseste pentru firele de tricotat foarte delicate, cum ar fi matasea sau anumite feluri de lana speciale (adica: scumpe).
Asezati tricotajul in forma pe care trebuie sa o obtineti si pulverizati cu apa, ca sa umeziti foarte putin lana. Tricotajul nu trebuie sa fie ud!
For blocking you need special tools: blocking boards, t-pins and blocking wires, especially if you want to block lace.
Ca sa blochezi un tricotaj iti trebuiesc unelte speciale, asa cum am mai zis: suprafete speciale de blocat, ace speciale si sarme inoxidabile de blocat.
I enrolled for several knitting classes on Craftsy where blocking was discussed. Some instructors want me to do only (or mostly) wet blocking. This method does not appeal to me, because I am impatient and do not desire to buy blocking tools. I know that the last argument sounds crazy, because I use to buy almost every new gadget for sewing and quilting. Guilty!
Am cateva clase pe Craftsy in care se discuta despre blocarea tricotajelor. Unii instructori te invatau sa blochezi numai (sau aproape numai) prin blocarea umede. Metoda asta nu-mi place, pentru ca nu am rabdare si nu doresc sa cumpar sculele de care am nevoie pentru blocarea umeda. Ultimul argument suna complet idiot din gura mea, pentru ca de obicei cumpar toate prostiile nou aparute, care se folosesc la cusut si quiltuit si dupa aceea scriu ce trebuie sa faci ca sa te lipsesti de ele. Recunosc ca sunt inconsecventa.
Sally Melville on Craftsy made me very happy when she admitted that she steam blocks with an iron most of her knits, provided they are not 100% synthetic.
Sally Melville m-a facut insa foarte fericita cu cursul ei de pe Craftsy in care spune ca ea blocheaza cu abur si fierul de calcat de cele mai multe ori, daca nu are fire 100% sintetice.
Blocking is not a simple process and takes a lot of time, as you can read in this excellent article
http://www.twistcollective.com/collection/component/content/article/35-articles/features/1547-block-party Please, read it. You will not regret it.
Blocarea umeda nu este un proces simplu si ia mult timp, dupa cum veti citi intr-un articol foarte interesant (vezi linkul de mai sus), pe care vi-l recomand din inima.
Cititi-l si nu veti regreta.

Here you see how unblocked lace and how wet blocked lace looks like (the pictures above and below are from this article).
Vedeti in poza de mai sus si in poza de mai jos cum arata dantela tricotata, dupa ce s-a facut blocarea umeda (pozele sunt din articolul la care v-am trimis).

Can you see the difference between this wet blocked lace and my steam blocked lace, using the steam iron in fraction of the time to wet block???? I cannot.
Vedeti insa vreo diferenta cu ce am obtinut eu prin blocarea cu fierul de calcat cu abur in cateva minute (sau oricum intr-o fractiune din timpul folosit de de doamna care a scris articolul)? Eu nu vad nici o diferenta.

How I blocked lace / Cum am facut eu blocarea la dantela
I did steam blocking with a steam iron (low temperature). My iron has only three settings for steam: low, medium / normal and hot. It appears that all the fabrics can be steam ironed with these settings.
Am calcat (de fapt presat) cu fierul de calcat la temperatura joasa (lana). Cea mai joasa temperatura la care poti obtine abur. De fapt fierul meu de calcat nu are decat trei posibilitati: temperatura scazuta (lana), temperatura medie / normala si temperatura ridicata.Se pare ca toate materialele de calcat intra in aceste categorii.
I did not use a press cloth, but I pressed (not ironed) very carefully and very lightly. To be able to make this picture I had to let the iron stay on the scarf for a couple of seconds. Nothing happened. I mean my scarf was not ruined by that, which means that the fear for blends with acrylic is somehow exaggerated.
Nu am folosit o carpa de calcat, dar am presat tricotajul cu foarte mare atentie si foarte usor. Ca sa pot face aceasta poza a trebuit sa las fierul de calcat cateva secunde pe tricotaj. Nu am stricat nimic, ceea ce insemna ca teama pentru blocarea cu abur a amestecurilor de lana cu acrilic este exagerata.

Put the lace on the pressing board and start at one edge, stretching the knit in form / the desired width. I spread it and take care to keep the edges in a vertical straight line.
I iron first on the wrong side.
Puneti tricotajul pe planseta de calcat si asezati-l in asa fel, incat marginile sa fie drepte si sa formeze o linie verticala. Incep sa calc la o margine si intind restul tricotajului in forma pe care o doresc. De fapt am grija ca largimea tricotajului sa fie exact cea pe care o doresc.
Calc intai pe spatele tricotajului.

Do not worry if the knit seams a little distorted. You can pat it in form.
Nu va faceti griji daca tricotajul pare sa se deformeze putin. Cat timp e umezit de abur se poate repune in forma. Tapotati usor cu degetele pe suprafata, ca sa se stranga, daca e nevoie.


Keep the edges and long ridges perfect vertical. No pinning, as you can see. Only my hands. Alison Smith - THE Alison Smith - is right: your hands are the best pressing tool.
Inca o data: aveti grija ca marginile sa ramana verticale si perpendiculare pe orizontala.
Nu am folosit nici un fel de ace speciale pentru blocare. Numai mainile. Alison Smith - celebra Alison Smith - are perfecta dreptate: mainile sunt cele mai bune unelte de calcat pe care le ai.
Very important!
* Wait until the knitted fabric cools off and is dry, before you move it to steam block the next portion. It takes more time and is a bit tedious, but not as tedious as wet blocking!
* TEST on the proof knitted block before you apply this method to the finished knit. Your yarn may not like the seam iron!
Foarte important!
* Asteptati intai pana se raceste si usuca tricotajul. Abia dupa aceea il puteti muta pe planseta de calcat, ca sa puteti bloca o noua portiune. Da, iti ia ceva mai mult timp si este plictisitor sa astepti, dar nu tot atat de plictisitor ca blocarea umeda!
* TESTATI orice fir de tricotat inainte de a aplica acesta metoda pe toata bucata triciotata. Daca veti tricota intai un esantion, veti putea incerca pe el. Probabil ca firele acrilice nu vor reactiona bine daca faceti blocarea cu abur.
Two scarves more for me to go, after I finish the bigger scarves. One for Jojo and a smaller one for baby Charlie Zoe. A lot of knitting to be done before Christmas.
I do not think that I shall have the power and will to knit another long one for me.
Fortunately I learned the pattern by heart (almost!) and I can knit now watching HBO or Netflix. This is the nice part of this project.
The pattern is here / Modelul il gasiti aici:
Time for knitted Christmas presents / A venit vremea sa tricotam pentru cadouri de Craciun
Mai am inca doua fulare mici de facut, dupa ce termin fularele mari. Pentru Jojo si pentru Charlie Zoe (Dumnezeule, ce nume! Nici acum nu mi-am revenit din soc. Evident, nu vorbesc de Zoe!). O gramada de tricotat inainte de Craciun. Nu cred ca voi mai avea dorinta sau puterea sa fac o esarfa mare pentru mine. Poate la anul care vine.
Partea buna este ca am invatat modelul pe dinafara si ca pot tricota in timp ce ma uit la HBO sau Netflix.
Am vazut serialul romanesc Umbre (Shadows). Evident ca am fost foarte mandra de cat de bine e cotat. Trebuie insa sa recunosc ca limbajul folosit mai mult l-am ghicit, pentru ca nu il cunosteam si nu il cunosc. Desi vin din Ploiesti, unde misunau smecherasii cu limbaj pitoresc... Oare asa se vorbeste acum in Romania???
Blocking is in fact stretching and shaping the knitted piece to achieve the desired form or to 'open up' lace.
Knitted lace must always be blocked.
Dupa cum probabil stiti, tricotajele trebuiesc blocate dupa ce le termini, ca sa puteti coase mai usor si mai frumos marginile. Sau inainte de a purta ceva tricotat dintr-o bucata, cum ar fi o esarfa.
Trebuie aici sa ii multumesc Dorinei din Timisoara, care m-a ajutat pe Lucru de mana sa aflu termenul folosit in romaneste pentru 'blocking', pe care nu-l stiam.
Blocarea inseamna ca se manipuleaza materialul tricotat umed, ca sa ia forma si dimensiunile dorite, dupa care se lasa sa se usuce, ca sa pastreze forma data.
Daca unele tricotaje nu au nevoie de blocare - desi e mai bine daca o faci, dantela trebuie intodeauna blocata.

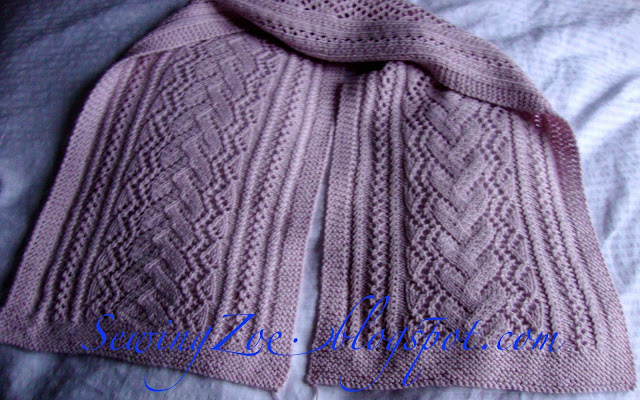
Dodo's scarf finished. Right: unblocked, left: blocked
Fularul lui Dodo. Partea din dreapta este neblocata, partea din stanga, da.
Fularul lui Dodo. Partea din dreapta este neblocata, partea din stanga, da.

Dodo's scarf finished. Both sides blocked
Fularul lui Dodo. Ambele parti sunt blocate.
Fularul lui Dodo. Ambele parti sunt blocate.
By the way, if you are wondering what I was doing after my last posting, well ... I was knitting, of course. Meters of lace scarfs. I almost finished the blue scarf I wrote about (1m50, but it has to be 1m80). I shall post a picture when it is finished, with tassels. First I need to try it on my friend, to see how much more to knit.
Fiindca am ajuns aici. Daca v-ati intrebat cumva ce am facut de la ultima postare... pai, am tricotat. Metri de esarfa, fara exagerare! Am terminat aproape esarfa albastra, despre care am scris cand am aratat modelul. In model scria ca trebuie sa aibe 1m50, dar am vazut ca de fapt trebuie sa tricotez cel putin 1m80. Cand o voi termina, voi pune o poza.
Intai trebuie sa o probez, ca sa vad cat mai am de tricotat.
After some knitting I decided that I like very much the pattern of the blue scarf and I want four more scarves: for my daughter in law and her three girls. For them I bought a pale pink wool/acrylic blend Phildar Lambswool 51 (51 % lambswool and 49% acrylic; color eglantine). Needle 3 (European size).
Below is the real color, because I still do not know how to adjust the light on my camera.
Dupa ce am lucrat cam 0,75 m la esarfa albastra, am ajuns la concluzia ca imi place foarte mult modelul si ca voi mai tricota inca patru esarfe pentru nora mea si cele trei nepotele. Pentru ele am cumparat un fir din lana si acrilat, Phildar Lambswool 51 (51 % lana; culoarea Eglantine). Andrele nr. 3.
Culoarea adevarata o vedeti in poza de mai jos, fiindca nici pana acum nu am invatat sa reglez lumina si culorile la aparatul de fotografiat.

Imi place foarte mult acest fir de tricotat, pentru ca are ambele avantaje ale materialelor folosite: lana il face calduros si formeaza ochiurile foarte frumos, iar fibra acrilica il face rezistent.
For mom I already knitted 1m60. Yesterday I met her and I saw that the scarf has to be much longer, because she wants it to wrap around the neck. I can understand that, although it means much more work than the pattern promised! -:)!
Pentru mama copiilor am tricotat deja 1m60. Ieri am fost la fiul meu si am probat-o. Mai am destul de tricotat, pentru ca vrea esarfa in jurul gatului. Nu peste gat, cum era in model. O inteleg si cred ca are dreptate, cu toate ca asta inseamna destul multa munca in plus pentru mine.
Her scarf is the complete width of the original pattern. For the girls I used only one repeat (22 stitches the lace pattern) plus edges (60 stitches for the width). One scarf is finished (tassels not yet, because I intend to make them all at once). I read that a scarf for a 3-4 years old child has to be 1m long. As I saw yesterday, it is the correct size.
Pentru nora mea am folosit modelul asa cum vi l-am descris, cu trei benzi de dantela. Pentru fetite am folosit numai o banda (22 de ochiuri banda centrala de dantela) si marginile. 60 de ochiuri in total. O esarfa este deja terminata. Are 1m lungime, asa cum am citit undeva ca trebuie sa fie un fular pentru copii de 3-4 ani. Ieri am vazut ca este exact dimensiunea de care au nevoie, ca sa fie bine in jurul gatului si sa nu fie prea lunga.
The twins are thrilled to have scarves like mom's.
Gemenele sunt foarte incantate ca vor avea acelasi fular ca al mamei lor. De fapt pentru ele am tricotat, ca sa fiu sincera!

By the way, I block as I go, as explained below. This helps me to decide if I knitted enough, because I can see the real finished form. No guess work about how long or wide it will be.
That's why mother's scarf seams finished, but it is not. You can see the needles on the top.
Inca un lucru. Eu blochez direct ('as you go") dupa ce am terminat o buna portiune din esarfa si nu astept pana e gata toata esarfa. Acest lucru ma ajuta si la masurat / probat, fiindca stiu cum va arata si ce dimensiuni exacte va avea cand va fi gata. Veti citi mai jos cum se face.
Pentru ca blochez pe parcurs, vi se pare ca esarfa mamei e deja gata, dar nu este. Se vad andrelele in capatul de sus.
Now about blocking. First some general stuff / Acum despre blocare. Intai in general
You can do (a) wet blocking, (b) steam blocking and (c) spray blocking.
We are always wet blocking when we wash the knitted garment and let it dry in form on a towel (or a clean garbage bag if you want to speed up the drying process) to regain the original shape.
Puteti face blocare (a) umeda, (b) cu abur si (c) prin pulverizare.
De fapt facem mereu blocare umeda dupa ce spalam tricotajele si le lasam sa se usuce, asezate pe un prosop in forma pe care o vor avea cand vor fi uscate.
Stiati ca le puteti lasa la uscat pe un sac de plastic mare curat, ca sa se usuce mai repede? Inainte de asta trebuie insa sa scoateti cat mai multa apa din tricotajul spalat, prin rulare intr-un prosop uscat.
Wet blocking is the recommended method if you are dealing with synthetic (man-made) fibers or blends with such fibers. As you can read below, I steam blocked a yarn with 49% acrylic without problem.
To force the knitted piece to retain the dimensions you want, you have to use rust-proof pins or blocking wires.
Blocarea umeda este recomandata pentru tricotaje din fire sintetice sau amestecuri cu astfel de fire. Dar dupa cum veti putea citi mai jos, eu am blocat cu succes un fir cu 49% acrilat, asa ca...
Ca sa fortati tricotajul umed sa ramana in forma pe care i-o dati, veti folosi ace speciale de blocat in forma de T si fire de metal de blocat. Ambele nu trebuie sa rugineasca.
Steam blocking is the best method with fibers you do not want to get wet, like cottons. Cotton knits completely loose their shape if they get wet. Be careful with synthetic fibers which dislike hot temperature, because steam is hot.
You can first join and steam or first steam and then pin.
* You steam with a dampened press cloth and a hot iron. Place the dampened press cloth over the knitted piece and press very lightly. Please press, not iron! You need to get the knitted fabric slightly moist, but press until the press cloth is dry. It should not take very long, because the press cloth was not wet, only dampened.
* You can do steam blocking with a steam iron. Keep the iron just above the knitted fabric and give good shots of steam.
Blocarea cu abur este cea mai buna metoda pentru fire care nu trebuie sa fie udate, cum ar fi bumbacul. Tricotajele de bumbac se largesc mult, dupa ce sunt spalate. Atentie la blocarea cu abur a firelor care nu suporta temperaturi ridicate, pentru ca se lucreaza cu abur fierbinte.
Puteti sa umeziti intai tricotajul cu abur si apoi sa il prindeti in ace de gamalie, dandu-i forma pe care o doriti. Dar puteti tot atat de bine sa asezati intai tricotajul in forma finala, folosind ace de gamalie si apoi sa faceti blocarea cu abur. Cum va va fi mai usor si cum preferati.
* Blocati cu abur folosind o carpa curata pe care o umeziti usor. Nu trebuie sa fie uda. Puneti carpa peste tricotaj si dati usor cu fierul de calcat. De fapt nu trebuie sa calcati (miscarea laterala a fierului de calcat, la stanga si la dreapta sau in sus si in jos), ci trebuie sa presati: fierul se lasa peste material si apoi se ridica pentru a fi pus pe un alt loc. Diferenta dintre calcat si presat este foarte importanta in quiltuit si in croitorie, deci cred ca stiati despre asta.
Tineti fierul practic desupra carpei, nu apasati tare si asteptati sa se usuce carpa. Nu va dura mult, fiindca carpa este foarte usor umezita, nu uda.
* Puteti sa blocati cu abur folosind un fier de calcat cu abur, fara sa folositi o carpa. Aici trebuie sa aveti grija sa apasati si mai putin cu fierul de calcat.
Spray blocking is used for very delicate yarns, like silk or special (I mean very expensive) wool sorts.
You have to pin the knitted fabric in shape and spritz a bit of water over it. The fabric should be just dampened, not wet.
Blocarea prin pulverizare se foloseste pentru firele de tricotat foarte delicate, cum ar fi matasea sau anumite feluri de lana speciale (adica: scumpe).
Asezati tricotajul in forma pe care trebuie sa o obtineti si pulverizati cu apa, ca sa umeziti foarte putin lana. Tricotajul nu trebuie sa fie ud!
For blocking you need special tools: blocking boards, t-pins and blocking wires, especially if you want to block lace.
Ca sa blochezi un tricotaj iti trebuiesc unelte speciale, asa cum am mai zis: suprafete speciale de blocat, ace speciale si sarme inoxidabile de blocat.
I enrolled for several knitting classes on Craftsy where blocking was discussed. Some instructors want me to do only (or mostly) wet blocking. This method does not appeal to me, because I am impatient and do not desire to buy blocking tools. I know that the last argument sounds crazy, because I use to buy almost every new gadget for sewing and quilting. Guilty!
Am cateva clase pe Craftsy in care se discuta despre blocarea tricotajelor. Unii instructori te invatau sa blochezi numai (sau aproape numai) prin blocarea umede. Metoda asta nu-mi place, pentru ca nu am rabdare si nu doresc sa cumpar sculele de care am nevoie pentru blocarea umeda. Ultimul argument suna complet idiot din gura mea, pentru ca de obicei cumpar toate prostiile nou aparute, care se folosesc la cusut si quiltuit si dupa aceea scriu ce trebuie sa faci ca sa te lipsesti de ele. Recunosc ca sunt inconsecventa.
Sally Melville on Craftsy made me very happy when she admitted that she steam blocks with an iron most of her knits, provided they are not 100% synthetic.
Sally Melville m-a facut insa foarte fericita cu cursul ei de pe Craftsy in care spune ca ea blocheaza cu abur si fierul de calcat de cele mai multe ori, daca nu are fire 100% sintetice.
Blocking is not a simple process and takes a lot of time, as you can read in this excellent article
http://www.twistcollective.com/collection/component/content/article/35-articles/features/1547-block-party Please, read it. You will not regret it.
Blocarea umeda nu este un proces simplu si ia mult timp, dupa cum veti citi intr-un articol foarte interesant (vezi linkul de mai sus), pe care vi-l recomand din inima.
Cititi-l si nu veti regreta.

Here you see how unblocked lace and how wet blocked lace looks like (the pictures above and below are from this article).
Vedeti in poza de mai sus si in poza de mai jos cum arata dantela tricotata, dupa ce s-a facut blocarea umeda (pozele sunt din articolul la care v-am trimis).

Can you see the difference between this wet blocked lace and my steam blocked lace, using the steam iron in fraction of the time to wet block???? I cannot.
Vedeti insa vreo diferenta cu ce am obtinut eu prin blocarea cu fierul de calcat cu abur in cateva minute (sau oricum intr-o fractiune din timpul folosit de de doamna care a scris articolul)? Eu nu vad nici o diferenta.

How I blocked lace / Cum am facut eu blocarea la dantela
I did steam blocking with a steam iron (low temperature). My iron has only three settings for steam: low, medium / normal and hot. It appears that all the fabrics can be steam ironed with these settings.
Am calcat (de fapt presat) cu fierul de calcat la temperatura joasa (lana). Cea mai joasa temperatura la care poti obtine abur. De fapt fierul meu de calcat nu are decat trei posibilitati: temperatura scazuta (lana), temperatura medie / normala si temperatura ridicata.Se pare ca toate materialele de calcat intra in aceste categorii.
I did not use a press cloth, but I pressed (not ironed) very carefully and very lightly. To be able to make this picture I had to let the iron stay on the scarf for a couple of seconds. Nothing happened. I mean my scarf was not ruined by that, which means that the fear for blends with acrylic is somehow exaggerated.
Nu am folosit o carpa de calcat, dar am presat tricotajul cu foarte mare atentie si foarte usor. Ca sa pot face aceasta poza a trebuit sa las fierul de calcat cateva secunde pe tricotaj. Nu am stricat nimic, ceea ce insemna ca teama pentru blocarea cu abur a amestecurilor de lana cu acrilic este exagerata.

Put the lace on the pressing board and start at one edge, stretching the knit in form / the desired width. I spread it and take care to keep the edges in a vertical straight line.
I iron first on the wrong side.
Puneti tricotajul pe planseta de calcat si asezati-l in asa fel, incat marginile sa fie drepte si sa formeze o linie verticala. Incep sa calc la o margine si intind restul tricotajului in forma pe care o doresc. De fapt am grija ca largimea tricotajului sa fie exact cea pe care o doresc.
Calc intai pe spatele tricotajului.

Do not worry if the knit seams a little distorted. You can pat it in form.
Nu va faceti griji daca tricotajul pare sa se deformeze putin. Cat timp e umezit de abur se poate repune in forma. Tapotati usor cu degetele pe suprafata, ca sa se stranga, daca e nevoie.


Keep the edges and long ridges perfect vertical. No pinning, as you can see. Only my hands. Alison Smith - THE Alison Smith - is right: your hands are the best pressing tool.
Inca o data: aveti grija ca marginile sa ramana verticale si perpendiculare pe orizontala.
Nu am folosit nici un fel de ace speciale pentru blocare. Numai mainile. Alison Smith - celebra Alison Smith - are perfecta dreptate: mainile sunt cele mai bune unelte de calcat pe care le ai.
Very important!
* Wait until the knitted fabric cools off and is dry, before you move it to steam block the next portion. It takes more time and is a bit tedious, but not as tedious as wet blocking!
* TEST on the proof knitted block before you apply this method to the finished knit. Your yarn may not like the seam iron!
Foarte important!
* Asteptati intai pana se raceste si usuca tricotajul. Abia dupa aceea il puteti muta pe planseta de calcat, ca sa puteti bloca o noua portiune. Da, iti ia ceva mai mult timp si este plictisitor sa astepti, dar nu tot atat de plictisitor ca blocarea umeda!
* TESTATI orice fir de tricotat inainte de a aplica acesta metoda pe toata bucata triciotata. Daca veti tricota intai un esantion, veti putea incerca pe el. Probabil ca firele acrilice nu vor reactiona bine daca faceti blocarea cu abur.
Two scarves more for me to go, after I finish the bigger scarves. One for Jojo and a smaller one for baby Charlie Zoe. A lot of knitting to be done before Christmas.
I do not think that I shall have the power and will to knit another long one for me.
Fortunately I learned the pattern by heart (almost!) and I can knit now watching HBO or Netflix. This is the nice part of this project.
The pattern is here / Modelul il gasiti aici:
Time for knitted Christmas presents / A venit vremea sa tricotam pentru cadouri de Craciun
Mai am inca doua fulare mici de facut, dupa ce termin fularele mari. Pentru Jojo si pentru Charlie Zoe (Dumnezeule, ce nume! Nici acum nu mi-am revenit din soc. Evident, nu vorbesc de Zoe!). O gramada de tricotat inainte de Craciun. Nu cred ca voi mai avea dorinta sau puterea sa fac o esarfa mare pentru mine. Poate la anul care vine.
Partea buna este ca am invatat modelul pe dinafara si ca pot tricota in timp ce ma uit la HBO sau Netflix.
Am vazut serialul romanesc Umbre (Shadows). Evident ca am fost foarte mandra de cat de bine e cotat. Trebuie insa sa recunosc ca limbajul folosit mai mult l-am ghicit, pentru ca nu il cunosteam si nu il cunosc. Desi vin din Ploiesti, unde misunau smecherasii cu limbaj pitoresc... Oare asa se vorbeste acum in Romania???


